Yep you read that right, I'm going to use an inkjet printer to make the label for the NFTT quilt "Better Together." My goal is use a picture of the finished top crediting each block marker and Beadlady for the quilting.
I'm using is the Epson Artisan 1430. There are a number of reason for this printer choice. First and foremost is the ink. Epson uses a pigment based ink versus a dye based ink. The pigment based ink will actually stay on fabric even through the washing machine. The second reason I chose this printer is because it is a wide format printer accommodating up to 13"x19" media. The third and final reason for choosing this printer is that it has a straight paper (or fabric) path. When you're trying to stuff unusual material through a printer it's important to have as few turns as possible.
This printer is brand new and I've never attempted to do anything like this before fortunately the printer came with Adobe Expressions software making the $200+ price tag a bit easier to swallow.
If you would like a bit of the history on using a printer to make fabric art Gloria Hansen has a wonderful article from 2003 called Inkjet Printing on Fabric. Here is another article from Gloria that discusses, in a bit more detail, the difference between pigment and dye based ink with some pictures reveling how each performs over time. Gloria is an incredible artist and a true leader in the digital revolution. I will be buying her book Digital Essentials.
My first task is to design the label. I'm not a great graphic designer but I have created more PowerPoint presentation then I care to remember. This task isn't all that different. I chose to use a picture of the quilt on the label so I could credit each person for their block contribution. So far using the software isn't all that complicated. I tried using a full blown version of Photoshop many years ago and I couldn't make anything work. Photoshop just wasn't intuitive for me this however is just fine. I seem to be able to do all the basic tasks without too much stress. I'm sure I'll have plenty of problems when I start trying to do more complicated images but that's for the future.
From what I understand you can print on any ole fabric but since this is all new to me I bought specially treated fabric with a paper backing. If I'd done more research I would have bought the treated fabric recommended by Gloria Hansen but I didn't so I'm using what I have, June Tailor Sew-In Colorfast. The directions are simple; put paper backed sheet in the printer fabric side up and print. Let it dry for ten minutes then set the ink with a hot iron, no steam, for one to two minutes. Heck it even printed the little quilt with good detail and all the writing is legible.
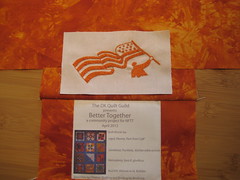
Next I have to cut down the label, cut down the little Kos Flagman Logo Florene hand embroidered and frame it all with some of that wonderful hand dyed fabric I got at the Sew Expo last month.
My first attempt did not result in a final label. My first mistake was not leaving enough white space around the label. I was concerned about the label being too big but clearly eliminating the edges just makes everything look crowded. The biggest lesson is do not poke extra holes in this fabric. I ripped out a seam, the last line of text was right on the seam line and boy oh boy every needle hole is still there. In the future I will not even use a pin unless it is absolutely necessary.
Give me a few minutes and I'll have pictures.
Here is the label:
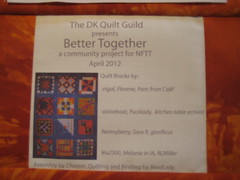
If you look closely at the bottom you can see the holes left from the seam I ripped out, ug.
Here is a general idea of how everything will look when it is all pulled together.
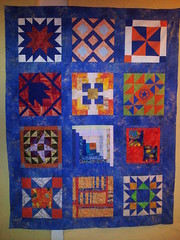
Here is a picture of the Better Together top before I shipped it to BeadLady for the quilting.
I can't wait to use this new tool for more then printing a fancy label!
